Fluentd v0.12の目玉機能としてFilterとLabelがある. この機能の導入にあたってはメッセージのルーティングを行う部分のコードがガラリと変わっているはずなので、興味本位で読んでみた.
機能についての参考文書
そもそもFilterやLabelって何?というあたりは以下が参考になる。
- Fluentd v0.12でのFilterとLabel
- Fluentd v0.12 is Released
- Fluentd v0.12の目玉機能らしいFilterを試してみた
- Fluentd v0.12 ラベル機能の使い方とプラグインの改修方法
v0.10ではどうだったか
Matchクラスがmatchディレクティブで宣言されたタグのパターンと、行き先のOutputクラスを保持していて、EngineClass#emit (最終的な呼び出し先はemit_stream)で該当するMatchを探し出し、そこに向けてemitする、という形だった.
1 2 3 4 5 6 7 8 9 10 11 12 13 | |
なので、ルーティングを管理するテーブルはEngineClassの@matches一つだったし、tagがルーティングのキーになっていた. 複数のOutputで順番に処理したい場合は都度tagを書き換えていく必要があった.
v0.12の場合
Agent, RootAgent, Label, EventRouterと言った新しいクラスが導入されている.
Label- 各
labelディレクティブの中に存在するFilterおよびOutputプラグインを管理するクラス
- 各
RootAgentlabelディレクティブに属さない(設定ファイルのルート直下にある)Input, Filter, Outputプラグイン、および各Labelクラスを管理するクラス
AgentRootAgentおよびLabelの親クラス.
EventRouter- ルーティングのためのルール(どのタグパターンに対して、どのようなfilterやmatchが存在するか)を管理し、イベントのルーティングを行うクラス
RootAgentおよびLabelのインスタンスは、それぞれ自分自身が管理する範囲のルーティングを行うEventRouterクラスのインスタンスを保持している.
以下、実際のコードを見てみる.
起動部分
まずは、configurationを読み込んでいく段階でどのようなクラスが生成されていくのかを見てみる.
Supervisor#start (init_engine)
Supervisorが起動して、色々と準備していく部分. init_engine内で Engine#init が呼ばれ、ここでRootAgentが生成される.
RootAgentの親クラスであるAgentのコンストラクタは以下のようになっている
1 2 3 4 5 6 7 8 9 10 11 12 13 | |
自身が管理するOutputクラス、Filterクラス達を保持するための変数が存在している. また、そのスコープでのルーティングを行うEventRouterクラスをここで生成している.
RootAgentについては、これに加えて更にInputやLabelクラスも管理するような構造になっている. (root_agent.rb)
Supervisor#start (run_configure)
Supervisor#run_conigureが呼ばれると、Engine#configureを経由してRootAgent#configureが呼ばれる.
ちょっと長いが引用.これにより以下が行われる
- labelディレクティブがあった場合
- add_labelにより新規
Labelオブジェクトを生成 - さらに、その
Labelオブジェクトのconfigureを呼び出す.configureの内容については、以下のAgent#configureを参照.
- add_labelにより新規
- sourceディレクティブがあった場合
- add_sourceによりInputプラグインのインスタンスを生成
- Inputプラグインがemitする際の投げ先として、以下を登録.
- そのInputプラグインで
@labelが設定されている場合→設定されたLabelオブジェクトのEventRouterを登録 - それ以外の場合→
RootAgentのEventRouterを登録
- そのInputプラグインで
Inputプラグインについては@labelが設定されている場合とそうでない場合で、emit先のEventRouterを切り替えることができるようになっている.
1 2 3 4 5 6 7 8 9 10 11 12 13 14 15 16 17 18 19 20 21 22 23 24 25 26 27 28 29 30 31 32 33 | |
さらに、RootAgentの親クラスであるAgent#configureでは同様にmatchに対してadd_match、filterについてadd_filterが呼ばれる.
1 2 3 4 5 6 7 8 9 10 11 12 13 14 | |
AgentはLabelの親クラスでもあるので、新しいLabelオブジェクトのconfigureが呼び出された際もこのコードが実行されることになる.
add_filterやadd_matchが何をしているかというと、そのAgentが持っているEventRouterに対してルーティングのルール(Ruleオブジェクト)を登録している.
絵にすると、、、
FluentdのBlogに書かれているサンプルを元に、どんな感じのオブジェクトたちが出来上がるかを絵にするとこんな感じ.
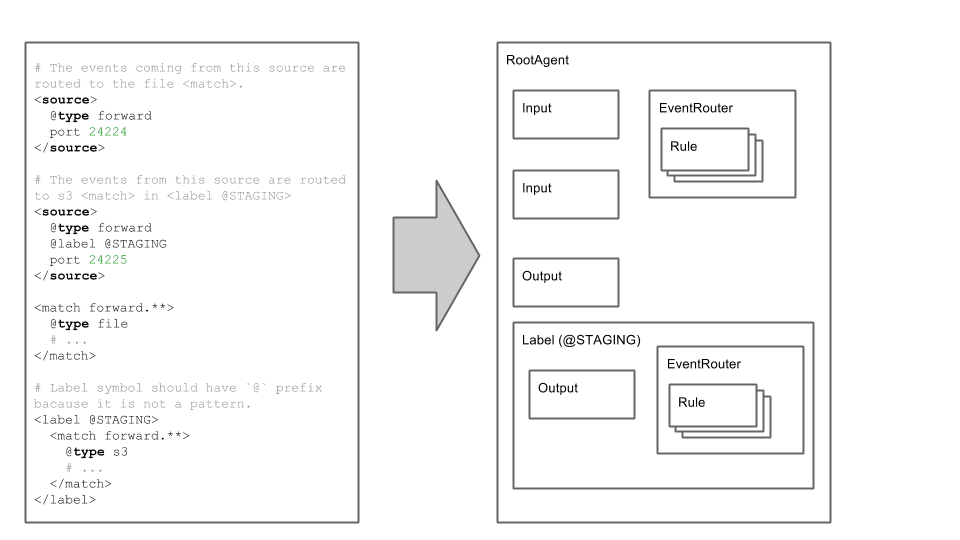
labelごとにルーティングテーブルを持つので、labelが違えば異なるルールでルーティングする、ということができるようになる.
emitの動き
ここまでで、各Input, Filter, Outputプラグインインスタンスは、自分がemitする先のEventRouterオブジェクトを知っていることになる.
まず、Inputプラグイン内では自分が知っているEventRouterにemitする.
1
| |
emitはemit_streamに飛ぶので、以下のコードが呼び出される. matchメソッドが返してきたオブジェクトに対してemitする.
1 2 3 4 5 | |
EventRouter#match に飛ぶ. matchはemitされたtagを受け取るべきCollectorを返す.
1 2 3 4 5 6 | |
このCollectorを探す部分がどうなっているかと言うと、
こんな感じになっている. つまり、Filterが使われていればPipelineオブジェクトを生成してそこにFilterやOutputを順次追加していく. FilterがなければPipelineの代わりにOutputを直接返す.
1 2 3 4 5 6 7 8 9 10 11 12 13 14 15 16 17 18 19 20 21 22 23 24 25 26 27 | |
よって、emitされたレコードはPipelineまたはOutputにemitされることになる. そして、Pipelineにemitされた場合は以下のコードに辿り着き、順番にFilterを通った後に最終的にOutputにemitされることになる.
1 2 3 4 5 6 7 | |
このようにFilterを実現するためにPipelineという新しい仕組みを導入しているため、tagの書き換えによる多段フィルタをしなくて済むようになっている.
まとめ
- v0.12のLabel, Filterを実現している部分のコードを読んでみた
- Labelの部分は、RootAgent(設定ファイルのROOT部分)および各labelディレクティブごとにルーティングテーブル(
EventRouter)を分けることにより実現されている - Filterは、レコードに対する連続した処理を表現する、Pipelineという新たな仕組みを導入することで実現されている